


Michelle Catherine Nelson obtained her PhD in conservation biology and studied sustainable agriculture, but ended up living in a high-rise in Vancouver. For years she had a plan to ‘one day’ do something different, to reconcile her love of city life with her passion for farm life. Is it possible to grow your own food when you don’t have even the smallest back yard? The Urban Homesteading Cookbook; Forage, Farm, Ferment and Feast for a Better World says that it definitely is.
Nelson and her “partner in crazy awesomeness”, Christopher Mull, raised rabbits and quail in their one bedroom apartment. These, along with fish, bees and insects, she calls ‘microlivestock’. Clean, quiet and easy to care for, they convert food to calories much more efficiently than traditional meat animals. Municipal bylaws will often allow them in the home since they are considered pets rather than livestock.

 Urban Homesteading offers the adventurous reader many different ways to source local food. It introduces us to foraging for edible plants, fishing, catching frogs, crayfish and snails. By learning to identify invasive species, we can provide meals for ourselves while keeping invasive populations of plants and animals in check.
If you’re not quite ready to commit to poultry in the living room, you can source sustainable ingredients from local suppliers. This helps to create demand for small producers dedicated to responsible, quality food production. Good food, good karma, good economy. With Urban Homesteading, you can learn to preserve these ingredients beyond the usual freezing and canning to include smoking, drying and fermenting.
Photographer Alison Page captures the beauty of nature in the urban environment and keeps the focus on the ingredients. I ususally like a lot of photos of the finished dishes, but this book is more how-to than cookbook, and this focus works well.
I decided to try Seasonal Fruit Leather as I had both strawberries and apples and wanted a change from applesauce. Since I used a dehydrator instead of the oven, I was able to make several smaller batches. I tried apples with cinnamon, strawberries with vanilla and one batch that I’m calling Fruit Surprise since it included the leftovers from the above and a pear I needed to use up. All were delicious and I doubt will last in the cupboard the several weeks that the recipe suggests.
The recipe for Pickled Quail Eggs looked so good I couldn’t actually wait to get quail eggs. I used chicken eggs instead and fussed with the liquid until I had enough. They will need to season longer than the smaller quail eggs so we are trying to be patient before we eat them.
If you already have some experience with urban homesteading this book stretches the boundries of what is possible. If you are new to the idea, it may seem crazy that people would keep chickens in the house, but give it a chance. Take baby steps. Grow some mint in a pot on the windowsill and use it to make tea. Bake a loaf of rustic bread. You never know where it might take you. Maybe out foraging for blackberries in the park. See you there!
 Pickled Quail Eggs
Pickled quail eggs are perfect for a relaxing evening or shared conversation with friends over beer. One rainy fall day, we paired these tangy eggs with a craft-brewed pumpkin ale, nutty crackers and cranberry duck pâté. Or you can skewer them onto an olive pick for a tasty cocktail garnish. They are so delicious that it’s hard to sit back while the eggs pickle in the brine—but it’s worth the wait!
2 dozen quail eggs, hard-boiled and peeled (see sidebar)
12 cloves garlic, peeled
1¼ cup (300 mL) apple cider vinegar
½ cup (120 mL) white vinegar
½ cup (120 mL) white wine (Riesling is my pick!)
1 tsp (5 mL) coarse salt
1 bay leaf
10 cloves
½ tsp (2.5 mL) turmeric
½ tsp (2.5 mL) paprika
½ tsp (2.5 mL) whole peppercorns
1. Place hard-boiled, peeled quail eggs and peeled garlic cloves in a 4-cup (1-L) glass canning jar, leaving at least 1 inch (2.5 cm) of space at the top. Bring vinegars and white wine to a simmer on the stovetop in a stainless steel pot. Add salt and spices and simmer for 5 minutes.
2. Warm the canning jar by running the outside under hot water for 30 seconds to prevent the glass from cracking. Pour hot liquid into jar over eggs and garlic so eggs are completely submerged. Screw on lid and allow the eggs to season for 1 to 2 weeks in the refrigerator before eating.Pickled eggs will keep in the refrigerator for up to 3 months.
Makes 2 dozen pickled quail eggs
HARD-BOILED QUAIL EGGS
Fresh hard-boiled eggs can be hard to peel, especially quail eggs. For best results, follow these directions.
Make a pinhole in the large end of the raw egg (this is where the air sac is located). Place eggs in a single layer in a saucepan and cover with about 1 inch (2.5 cm) of cold water. Place the lid on the pan and bring to a boil. Remove from heat and let sit with the cover on for 10 minutes. Remove the eggs from the hot water (leaving water in pot) and put in a bath of ice water for 1 minute.
While the eggs are in the ice bath, reheat the water to a simmer. After 1 minute of cold, place the eggs in simmering water for only 10 seconds. This will heat up and expand the shell away from the cold egg inside. Crack the shell from the large end where the pinhole was made. Gently roll the egg between your hands to crack and loosen the shell all over before starting to peel under cold, running water.
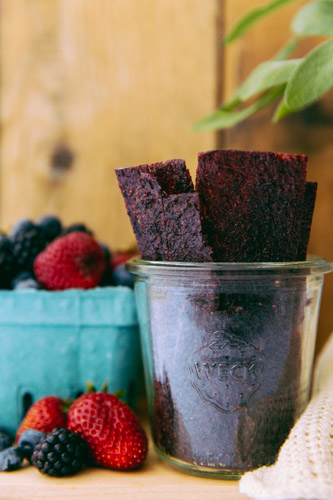 Seasonal Fruit Leather
Making this fruit leather fills the kitchen with the sweet smell of your summer or fall harvest simmering on the stove. Store these tasty, nutritious treats all the way into winter—if you can resist them for that long.
8 cups (2 L) fruit, such as berries, apples, pears, peaches, plums
1 cup (250 mL) water
Sugar to taste
Lemon juice to taste
Spices, such as cinnamon or vanilla
1. Rinse the fruit and remove any branches and leaves. Chop and remove pits and seeds.
2. In a large saucepan over medium heat, bring fruit and water to a simmer. Reduce heat, cover and let simmer 10 to 15 minutes, until the fruit has softened. Uncover and mash the fruit in the pan. Taste and add sugar and lemon juice if necessary. Add sugar 1 Tbsp (15 mL) at a time and lemon juice 1 tsp (5 mL) at a time. Add any spices that go well with the fruit you are using. Simmer until fruit mixture has started to thicken (about 5 to 10 minutes).
3. Purée the mixture in a food processor. Taste again and adjust sugar, lemon juice or spices. Pour the mixture into a large baking sheet with a rim to a thickness of 1/8 to ¼ inch (0.13–0.6 cm).
4. Preheat the oven to its lowest setting (around 140F/60C). Place the baking sheet in the oven. For conventional ovens, prop the door open an inch (2.5 cm) or so to allow airflow. If you have a convection oven, use the convection setting as it will dry the fruit leather faster. No need to prop oven if you have a convection oven, which will circulate air inside by itself.
5. Let the fruit leather dry in the oven until it no longer runs when you lift the pan and a knife doesn’t slide into it easily. This will take anywhere from 8 to 24 hours.
6. Peel the fruit leather off the baking sheet. Cut into strips and roll up in parchment paper.
7. Store in airtight containers (such as glass jars) in the cupboard for several weeks or in the freezer for a year or more.
Makes about 24 strips


